
Growing Tips
How To Use SpeedyVeg™
Using SpeedyVeg™ with NPK’s
Some growers prefer organic nutrients only, others like to use a combination. Many times growers are happy with their results using (N,P,K) and are only using SpeedyVeg™ to further improve their yields and decrease grow times.
In that case we still recommend that you decrease the amount of the NPK’s feed to your plant by 20%-30% because SpeedyVeg™ helps increase the uptake of all the nutrients the plants need, thereby improving the plants overall health and decreasing the chances you burn your plant. Your feeding schedules should not change, just add SpeedyVeg™ every time you water or twice a week and watch how “speedy” you get to “veg” then to harvest!
When to use
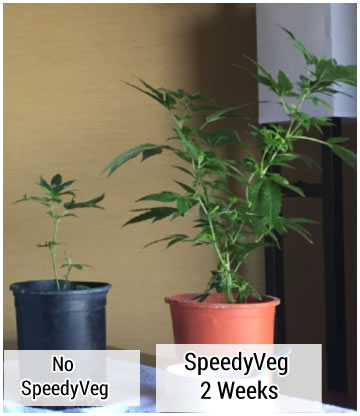
SpeedyVeg™ was specifically formulated to accelerate the plants natural veg time but up to 20%, and that is when you will see the most outrageous increase in growth. But many of our growers continue to use it through the first four weeks of flowering as plants will also see benefits during the blooming cycle. It has recently been discovered that many of the trace mineral micro nutrients found in SpeedyVeg™ are vital during the late phase of growth to stimulate thicker bud, to produce more trichomes and increase THC percentage no matter what strain of cannabis you are growing.
Easy Indoor Directions
Indoor Soil Use: It is very common for indoor growers to water and feed their plants every three days. SpeedyVeg™ is easy to use for these indoor plants, a 10-gram treatment or 1 scoop per plant is applied with each watering. For best result mix SpeedyVeg™ with 4oz-8oz of water, shake or mix until dissolved and apply directly to soil at the base of the plant. Applying this way the nutrients quickly follow the water pathway to the roots of your plants and incredible results will be seen within 2-3 weeks.
Hydroponic Use: Depending on the system, hydroponic growers may water and feed plants several times a day. It is recommended SpeedyVeg™ be used on plants every three days or a minimum of two times per week. Use 10-grams per treatment or 1 scoop per plant into the reservoir and allow time to dissolve. Most reservoirs have a circulation
Water Time is Feeding Time
With Speedy Veg created as a time release product, every time you water your plants it’s also feeding time. That’s because every time you water the plant the nutrients are carried by the water down where the nutrients are available at the root level.
Start with Great Genetics
It’s really tough to get truly top-shelf buds if you start with mid-grade seeds, clones, or the dreaded bagseed; you’re giving yourself a much higher chance of disappointment because no growing method can overcome genetics! Choosing the right strain lets you choose the looks and effects you want! First time growers often start growing with any seeds they can find. They usually grow pretty well but the resulting weed never ended up being as good as the buds as you hoped. And sometimes the buds would be airy and not-that-potent.
After a few attempts at growing bagseed, people try buying cannabis clones from the local dispensary with crazy strain names like “Super Grand Daddy Purple” and “Grapefruit Bubblegum Kush,” but still yields and results still left a lot to be desired. It’s not that there’s any inherent problem with clones – clones are awesome! – but you get a feeling these plants weren’t really the strains the dispensary claimed them to be. If you don’t have any grower friends then bag seed and local clones were you best choices, unless you know about online seed banks like http://www.growweedeasy.com/seeds
Buying seeds from a reputable cannabis seed bank and getting chosen strains shipped to you, are critical in being able to consistently produce high-quality buds! Getting your genetics from a reputable breeder is key to producing gorgeous and potent buds! Just switching to better seed stock caused a dramatic increase in my yields without any other changes. But even more importantly, the quality of my harvests drastically improved. Not to mention the freedom of being able to choose which strain you want to grow instead of hoping to find a good seed in your buds!
Clones are still a great way to start a grow with good genetics, but you have to make sure you always get clones from a trustworthy source! If you want to take your quality to the next level, don’t start with just any clones or seeds. Search for the right, true quality genetics and don’t be afraid to research to make sure you’re getting exactly what you want! Good seeds cost more than bagseed, but the money you pay for quality is worth it, especially when you consider what you’re getting in return!
Give Your Cannabis Lots of Light!
If you want great bud, you have to provide plenty of light! When you start a grow with good genetics – from good seeds or clones – your plant has the potential for a high level of quality (yields, potency, resilience). However, it’s nearly impossible for your plants to reach their potential if you use lights that are underpowered.
Powerful grow lights like HPS, LECs or LEDs produce the biggest and most dense buds
For example, there’s no amount of plant training or growing skill that can make up for the amount of light produced by an incandescent bulb; the bulb simply doesn’t have what it takes to do the job.
Similarly, growers can have the same problem when they try to grow a larger plant with a few small CFLs or T5s. Although CFLs and T5s make great growing lights and produce a high-quality product, it’s important to pick the right tool for the job. These two types of lights are better at stealth, discretion, and smaller grows than producing lots of super potent bud. Strong, bright light is what powers the growth of buds in the flowering stage – light is like “food” for your plants!
When it comes to indoor cannabis gardening, more light is better…to an extent. If you give your flowering cannabis plants all the light they can handle without giving them to much it increases your potency, density and yields. Strong, bright light is a crucial part of reaching a strain’s full potential! Strong light is incredibly important for the hig
hest potency and yields!
Sugar or Carbohydrates
A cheap alternative to expensive sugar-based bloom boosting supplements is blackstrap molasses. Giving this to your plants for the last few weeks before harvest can help them get bigger and smell/taste better. It’s not specially made for plants; it’s the regular stuff you’ll find in your kitchen or at the grocery store. Blackstrap molasses adds sugars, amino acids and trace minerals. Unfortunately for hydro growers, anything organic like molasses is not suitable for a hydroponic reservoir! But molasses works great for soil or coco growers 🙂 For last 2-3 weeks before harvest, give 1/2 tsp of Blackstrap Molasses per gallon when watering (for soil or coco coir)
Better Taste, Better Smell – Increase Terpene Content
The smell and scent of cannabis buds are produced by plant chemicals known as “terpenes” (also “terpenoids”, which are a class of terpenes). Terpenes contribute to the flavors of many household spices (like cinnamon, rosemary, cloves and ginger) and help create the scent of most flowers. The unique combination of terpenes and terpenoids produced in cannabis flowers (buds) cause most of their taste and smell as well.
Specific micro nutrients like those found in SpeedyVeg™ increase the terpene content of your buds so you produce cannabis that tastes and smells great and can also have a big impact on the THC percentage your flower produces.
Avoid Chemical Nutrients

Try to avoid chemical nutrients and only use nutrients made from living sources (made from things like kelp, guano, bone meal, worm castings, etc). Chemical nutrients are nutrient sources listed on the nutrient bottle with molecular compound names like Ammonium Phosphate, Magnesium Carbonate, Potassium Nitrate, etc.
Restrict Overall Nutrient Levels in Last 6 Weeks of Flowering
Cannabis plants do a lot of vegetative growth during the first several weeks of flowering and need a lot of nutrients to power that growth. However, around 6 weeks after the switch to flowering, they’ve mostly stopped growing new stems and leaves altogether and at this point their nutrient needs go down quite a bit.
Around week 6 of the flowering stage, your plants will mostly stop growing new stems and leaves, and needs lower levels of nutrients (especially Nitrogen) until harvest
Now, you don’t want to starve your plant of nutrients in the flowering stage because that will cause early leaf yellowing and ultimately hurt yields and bud appearance. If your plant already looks pale green all over, you don’t want to reduce nutrient levels further.
However, as far as smell is concerned, it’s important not to go overboard during the last 6 weeks of the flowering stage with nutrients, especially Nitrogen, as it can deposit a “green” or “chemical” taste/smell to buds. This is true whether you’re using chemical or organic nutrients, though it’s harder to over-fertilize with organic nutrients.
High levels of nutrients, especially the kind found in liquid plant food, can deposit extra nutrients into the buds themselves, possibly altering the taste and smell. After buds are fully formed you don’t want to overdo it with Nitrogen or other nutrients. In addition to hurting the smell, too much Nitrogen can also prevent buds from fattening properly!
Grow in “Living” Soil (Virgin Soil)
Even better than giving your plant organic nutrients is to grow with your roots in a living soil. In other words, this is a type of soil with an active colony of microorganisms. It is like the soil a plant would be using in nature, only it’s even better because it’s been amended with exactly the right kind of nutrients like found in SpeedyVeg™. There’s evidence buds grown in this medium tend to have a more varied and complex terpene profile, which may lead to buds that smell and taste better.
Maintain Proper Temperature and Humidity
Temperature
Maintain daytime temperatures around 65-80°F (18-26°C) in the flowering stage unless you’re using CO2 which does best at around 80-90°F (26°-32°C). However, even if you’re using CO2, most growers recommend you back off and bring the temps down to 65-80°F for the last two weeks before harvest.
Night temperatures should be kept around 68-75°F (20°-24°C) for most strains. Too-cool temps increase the chances of bud rot, which thrives in the 60°F (15°C) range, and freezing temperatures can actually damage or even kill your plants.
However, if you’re growing a strain that turns color, keep in mind that some of these strains will only show their color when night temperatures are at least a few degrees cooler than during the day in the flowering stage. Some strains need slightly cooler night temperatures before their buds will turn colors. For example the buds of this Auto Frisian Dew turned bright purple after it started getting below 70°F (21°C) temperatures at night.
Humidity
Humidity stumps a lot of new growers and causes several unexpected problems.
Maintaining higher humidity during the vegetative stage will reduce salt levels within the plant while encouraging healthy and lush growth.
During the vegetative stage, if humidity drops below 40%, especially anywhere below 25%, it can cause problems that look like nutrient deficiencies or light/heat stress!
But in these cases, just adding a little moisture to the air does wonders, even if you don’t change anything else.
During the flowering stage, your cannabis plants actually prefers less humidity!
Decreasing moisture in the air (lowering the humidity) during the flowering stage helps prevent mold and actually may increase trichome production in your buds! For best results, keep humidity 40%-50% during the flowering stage. Lower humidity levels in the flowering stage helps promote trichome production, which increases the amount of “glitter” you see on buds
And there’s one more insider trick you need to know about humidity:
So you know you need to keep humidity in 40-50%RH range for the flowering stage, but there is one extra trick… Use a dehumidifier to drop the humidity down as low as you possibly can for the last 2-3 weeks of flowering (I’ve gotten the humidity as low as 25%).
This extreme dryness will encourage the buds to seal and protect themselves with additional resin (in other words, a sparkling outer layer of THC-heavy trichomes).
As an added bonus, this trick also gets your buds prepped for a successful, mold-free drying process because your buds have already given up some of their moisture.
Make Sure Your Grow Room Has Strong Air Flow & Good Ventilation
This is yet another factor having to do with air quality (we already listed temperature and humidity). Over time, any grower (especially indoor growers) will see that great air quality is a big contributor to star-quality buds. Air flow and ventilation are essential if you want to create perfect air quality.
For 1-3 plants smaller to mid-sized plants, you’ll probably be fine with an oscillating fan or two. With a big grow and hot lights, you’ll need a better exhaust system to ensure proper airflow, but it can be easy to set up!
Basics 101 – Drying & Curing
You probably know that in order to get the best results, your plants need to make it through the majority of their lifecycle without major problems. But although your growing methods are incredibly important, one of the most important things to focus on is when you harvest, as well as the process of drying/curing your buds after harvest.
In fact, the things you do during and after harvest, including drying/curing, makes up almost 50% of your final bud appearance! Drying/curing the right way will make buds smell and look better, while being more dense, and more potent!
If you haven’t really been paying attention during the drying/curing part of your grow, you should focus here for the greatest gains in quality! Drying buds slowly and then curing them in glass mason jars for 2-4 weeks helps “tighten up” buds so they are more dense. Curing also intensifies smell and increases potency!
Buy Now to start growing 20% faster!